STEP BY STEP
When laying ceramic tiles, it is necessary to comply with the valid standards and guidelines ( Final works in construction; Execution of ceramic works – Technical requirements SRPS U.F2.011 ).
1. SUBSTRATE PREPARATION
The substrate for laying the tiles must be load-bearing, without cracks, clean and flat. The bumps must first be sealed with sealants and then treated with an impregnation emulsion for tiles. A special segment of quality protection is the installation of waterproofing materials and coatings. Correct the specification of the method of use and application should be used according to the manufacturer’s proposal. If the tiles are placed on larger floor surfaces or surfaces with pronounced transitions between rooms on the same level, it is mandatory to apply expansion joints or moldings.
2. INSTALLATION PLANNING
Tile tone
The tone of the tile is marked on the packaging and indicates small differences in the intensity of the color or surface structure. In order to prevent the surface tone problem, it is necessary to check that the boxes have the same tone mark. And when you have boxes with the same marked tone, we advise you to combine tiles from different boxes to prevent possible minor deviations that may occur. When installing “I” class tiles, tiles of the same caliber and tone (shade) must be used for the same room. Always check the tone in a fully lit area or in daylight.
When buying, increase the quantity by 10-15% due to cutting and fitting. Tile dimension
Gauges are defined as deviations in length and width from the nominal dimension. According to the EN 14411 standard, these deviations can be, depending on the type and type of tiles, from 0.5% to 1% of the dimension. When choosing and gluing tiles, special attention must be paid to determining the caliber of the tile. The tile calibers are identified and explained tabularly on the package with information where tiles of the same caliber must be used, and where, in exceptional cases, adjacent calibers may be used. Placing tiles as an imitation of natural materials
The development of tile manufacturing technology and the introduction of digital printing significantly improved the possibility of installation pattern tiles that have an extremely natural look of wood, marble, stone, concrete and similar materials. The specificity of these tiles is the availability of different faces (patterns). There is no need to assemble the tiles made in this way into continuous patterns, but to place them randomly, which contributes to the natural appearance of the surface.
Complaints are not accepted for installed tiles. Installation of rectangular tiles
Tiles can be installed straight and sheared, but up to 30% of the length and/or width. It is not recommended to lay tiles without a joint or to lay them with 50% shear. The rectangular tiles should have a slightly raised middle, with the fact that the degree of curvature must be repeated on all the tiles that are installed.
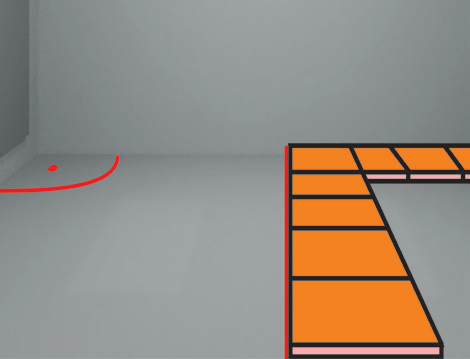
Positioning
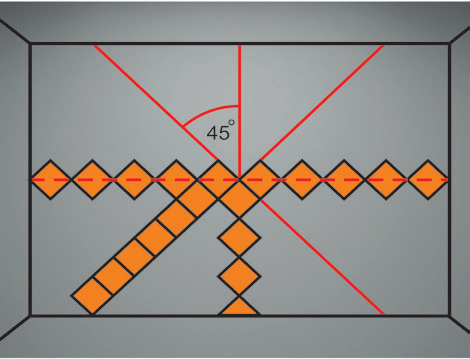
When installing at a right angle, align the first row according to the mason’s thread, or ruler. For laying on the floor, place a ruler or mason’s thread in the middle of the room parallel to the side walls. Pay attention to the monitoring and planning of expansion joints that are in concrete and plastered parts (especially in outdoor areas, where expansions must be more frequent). In the case of diagonal placement, the longitudinal and transverse axes of the room are first determined, and then an angle of 45° is determined between them. Rows of tiles are placed straight along the length of the corner mark, and diagonally next to the longitudinal and transverse axes.
To install tiles on the wall, it is necessary to ensure that the wall surface is perpendicular to the floor surface and measure the initial height of the tiles well so that in the case of installing tiles up to the ceiling, the whole tiles can be used without cutting. Always install from the floor to the ceiling. This will also help you to match and follow the joints on the adjacent walls.
3. GLUING TILES AND GROUTING
Tile adhesive
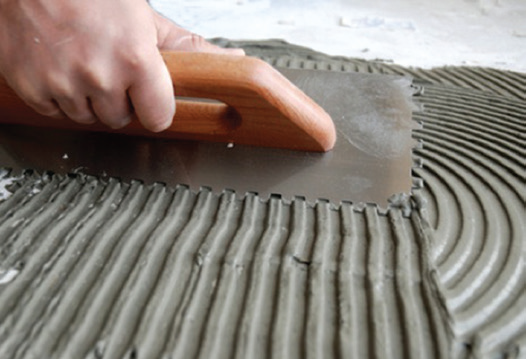
During installation, it is necessary to use glue that corresponds to the purpose and the tiles to be installed, and according to the manufacturer’s recommendation and specification. Tile glue is mixed until the mass becomes homogeneous (without lumps), after which the glue is applied with a notched trowel to the surface and to the tiles.
For the installation of larger size tiles and porcellanato tiles on the wall, it is mandatory to use flexible adhesives (C2 – S1 or S2 classification).
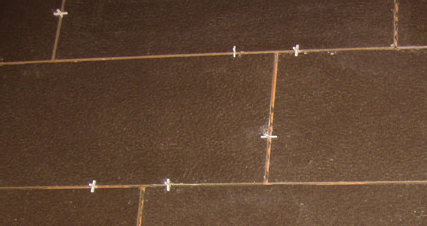
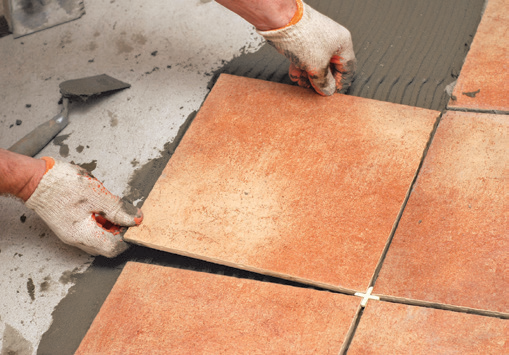
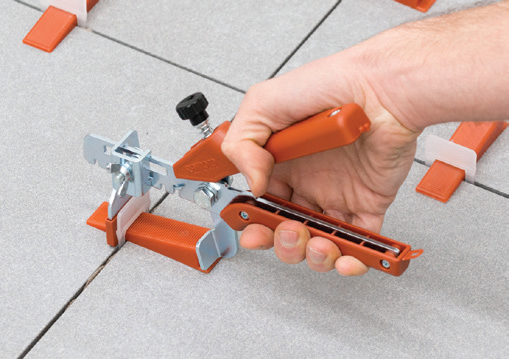
Laying the tiles is done by gently pressing the adhesive until all the air is squeezed out, after which the tile is positioned and leveled by tapping with a rubber mallet, or using wedges and a leveling system. When laying, adhere to the same joint width (recommendation is 2mm for wall tiles and 3mm for floor tiles) using crosses, which are placed in the upper half of the tile thickness, or a suitable leveling system.
After the glue has completely hardened on the tiles (drying), you can start grouting. When preparing the grout, strictly follow the manufacturer’s instructions. Spread the prepared material evenly on the substrate with the help of a rubber trowel. As long as the grout is fresh, its rough residue can be removed. In order to ensure proper sealing, it is necessary that the joint is filled to the top, level with the surface of the tile. This protects the edge of the tiles when crossing e.g. vehicles, pallet trucks, or moving unsecured loads.
In the case of the food industry, it is necessary to use epoxy joints due to the specific requirements of the standard in terms of hygiene, resistance to chemical products, physical resistance to the passage of vehicles and the very frequent presence of water or moisture. By using expansion joints that follow the elements of the structure, a space is obtained that absorbs the expansion and contraction of tiles, torsional forces, temperature changes, etc. Tiles are placed to follow these flexible joints. Expansion joints are filled using material that corresponds to the mechanical and chemical conditions to which the surface will be exposed.
Places where the joints are applied should be cleaned, and do not use products that contain oils and fats.
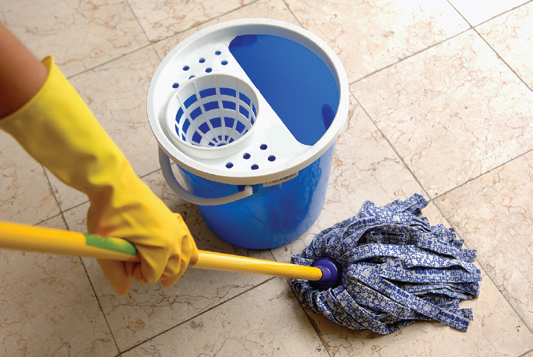
4. CLEANING
The first cleaning takes place already after placing the grout. After sealing, the surface of the joint should be smoothed and the remnants of the mortar should be removed from the tiles with a damp cloth. Frequent rinsing and water changes are necessary for a better cleaning result. After a period of 24 hours, thorough cleaning should be done with a mixture of universal solvents and warm water, exclusively according to the instructions of the manufacturer of the means used. For mechanical cleaning, machines equipped with rotating brushes and dispensers of cleaning agents can be used.

Detergents that leave a surface layer of wax or grease should not be used, as this allows dirt to remain on the surface and may have a negative effect on the anti-slip properties of the tiles. Based on the manufacturing method and the materials used for the application, there are the following types of listel and decor:
- lists and decorations decorated with ceramic colors and glass
- listers and decorations decorated with colors, glass and precious metals (gold, platinum) or ceramic lister
After grouting the surface of the parts where the listed tiles or decorated decorative tiles are installed, it is necessary to carefully remove the excess grouting compound, in order to protect the ceramic accessories from the abrasive action of the grouting compound.
WITH SPECIAL ATTENTION, MAINTAIN LISTLES AND DECORATIONS WHICH ARE USED FOR DECORATING PRECIOUS METALS AND CERAMIC LISTLES
When cleaning immediately after installation, as well as during subsequent maintenance, DO NOT use abrasive and aggressive cleaning agents (varicin, sonic acid…). The customer assumes the risk, if damage occurs, if he does not follow the recommendations for the installation and maintenance of ceramic tiles.
For all questions and consultations – CONTACT US
freephone for information 0800 360 361
e-mail: keramika@zorka-keramika.rs
website: www.zorka-keramika.rs